
Passport & entry

Point of Embarkation on Visit Japan Web: What to Enter

What should you enter for Point of Embarkation on Visit Japan Web? See direct and connecting-flight examples, plus what to do when your city is not listed.

Last updated:

Quick answer

Enter the departure city requested by the live Visit Japan Web form—not your airport in Japan. Select a matching candidate; if none appears, follow the current form’s direct-entry or help instructions. For a connection, keep the full confirmed itinerary open and enter the Japan-arrival flight number in its separate field.

1

Open the confirmed itinerary

Check every segment, the current route and the flight that arrives in Japan. Do not copy an airport from an old booking or another traveler’s example.

2

Search the departure city

Type part of the city name and select the matching candidate. The official manual says you may enter the point directly if it is not listed.

3

Check connections and the flight number separately

Read the live form help and keep the complete itinerary open. Enter the requested Japan-arrival flight number in its own field, then review every item before registration.

Useful Japanese phrase

Please confirm the departure city for this itinerary.

この旅程の出発地を確認してください。

Kono ryotei no shuppatsuchi o kakunin shite kudasai.
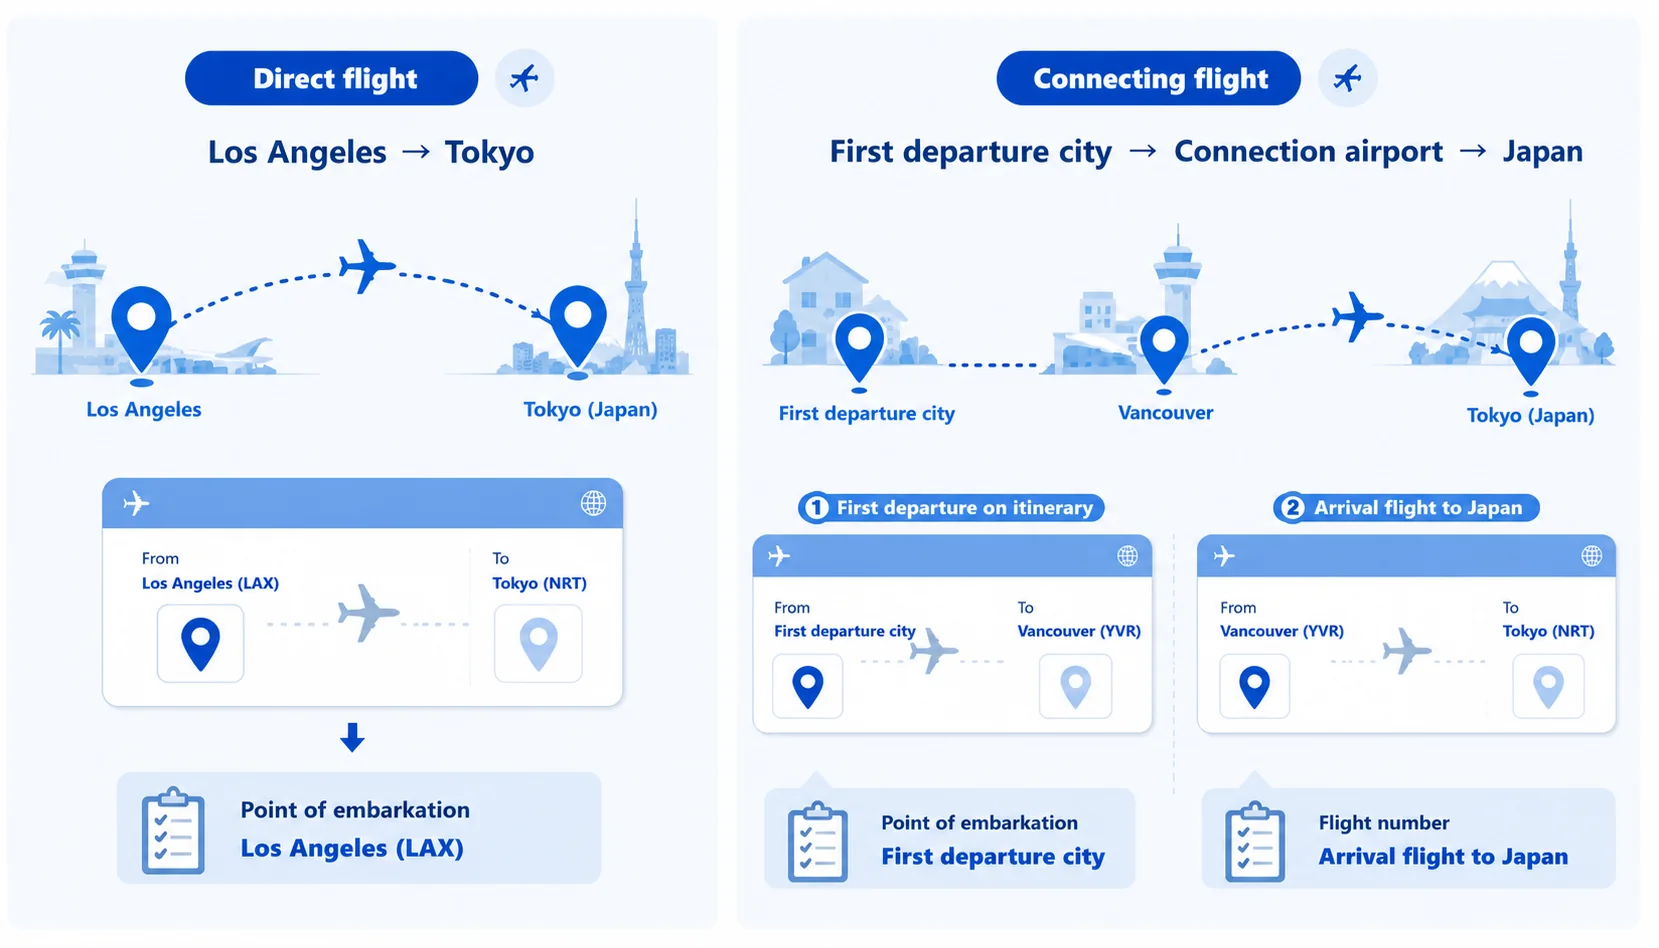
Enter the departure point requested for your journey—not your airport in Japan

For a direct flight, this is the city where that flight departs. If your itinerary has connections, use the current Visit Japan Web help text and the confirmed ticket: the point of embarkation and the flight number may refer to different parts of the itinerary.

Answer the field without guessing

Use your confirmed ticket in this order

  1. 1
    Open the final ticket or airline itinerary

    Do not use an old booking, a draft itinerary or the airport you hope to use. Check every city and flight segment on the confirmed document.

  2. 2
    Read the live field help

    Search the departure city in the list. If no matching option appears, follow the current screen's instructions for typing it directly or opening official help. An older screenshot or PDF should not override the live form.

  3. 3
    Enter the airline and flight number separately

    Use the flight information requested for the service arriving in Japan. Do not assume that the city field and flight-number field must describe the same segment on a connecting itinerary.

  4. 4
    Review before registration

    Make sure the arrival date, Japan arrival airport, airline, flight number and departure city match the current trip. Correct changed flights before showing the 2D code.

Diagram comparing the point of embarkation and Japan-arrival flight details for direct and connecting itineraries
Use the departure city requested by the current Visit Japan Web screen, and enter the requested Japan-arrival flight number separately. On a connecting itinerary, keep every segment open and follow the live wording rather than copying another traveler’s example.

Common examples

Direct flightLos Angeles → Tokyo

Enter LOS ANGELES as the point of embarkation and enter the flight number shown for the Tokyo flight.

One through ticket with a connectionHome city → connection → Japan

Use the first point the current form says can be confirmed from that ticket. Enter the flight number requested for the segment arriving in Japan. Keep both parts of the itinerary open while entering them.

Separate tickets or self-transferTwo unrelated bookings

Use the confirmed ticket or itinerary that the current arrival registration is asking about. If the live wording does not resolve the split booking, use the official support link instead of inventing a city.

Ship or ferryPort of departure → Japan

Select or enter the departure point for the vessel and enter the vessel information requested by the live form.

Do not copy a blog screenshot blindly

Visit Japan Web screens and field instructions can change. Start from the Digital Agency's official page, compare the live wording with your confirmed ticket, and correct the registration if the airline changes your route.

Point of Embarkation FAQ

What if the city or airport is not shown?

What does “Point of Embarkation” mean on Visit Japan Web?

It is the departure point requested for the journey you are registering. For a direct flight, enter the departure city shown on the confirmed itinerary—not the airport where you land in Japan.

What should I enter for a connecting flight?

Open the full confirmed itinerary and read the help text on the current form. The departure-point field and Japan-arrival flight-number field are separate, so do not assume they must describe the same segment. If the wording does not resolve a self-transfer or separate-ticket itinerary, use official Visit Japan Web support instead of guessing.

Why is my departure city not in the candidate list?

Type part of the city name and check the suggested candidates. If nothing matches, use direct entry only if the current form allows it, or open its official help. Use Latin letters and the city spelling from the confirmed itinerary.

Should I enter an airport code such as LAX or the city name?

Enter the departure place in the format accepted by the live form and choose its matching candidate when available. Do not substitute your arrival airport in Japan for the departure city.

What if my airline changes the route after I register?

Edit the trip before arrival so the date, route, airline and flight number match the new confirmed itinerary. Do not rely on an old 2D code after a material flight change.

Finished this field?

Continue with the complete Visit Japan Web guide for immigration, Customs and the arrival 2D code.

The Digital Agency service and official landing page were rechecked September 20, 2026. The former direct PDF-manual URL is no longer available; use the current service's field help and your confirmed itinerary. Airport instructions take priority over this explanation.